i7-950 + Sabertooth X58 + AMD HD 5850 Hackintosh Guide

UPDATE November 6, 2011: This guide is now obsolete. There is now an official, working DSDT you can get from tonymacx86.com. All you have to do is follow this guide and use the new DSDT (make sure you’re on the latest BIOS, 1304). I have successfully followed that guide for my Sabertooth X58 with i7-950, 12 GB 1600 MHz RAM, AMD Radeon HD 5850, and 1304 BIOS. I will be keeping the guide posted here because I spent a lot of time making it and I don’t just want to delete it and break a bunch of links. Also, it brings a bunch of traffic to the site. ;)

Note: Make sure you only have 2GB of RAM installed when you install OS X. After OS X is installed, you can put your RAM back.

Note 2: When I set this up, my BIOS was 0602.

1. Buy a Mac OS X Install Disk.

2. Get iBoot & MultiBeast

3. Get the DSDT.aml file. You need to be logged in to the tonymacx86 forums to do that. It’s at the bottom of the linked post.

4. Boot the computer using iBoot.

5. Once iBoot is booted, eject the disk and insert the OS X disk, then press F5.

6. Select the Install disk.

7. The installer will run. Click Utilities->Disk Utility and format your HDD to Mac Journaled FS. Make sure to click options and set it to GPT.

8. Once that’s done, quit Disk Utility and resume installation.

9. Finish the installation.

10. Reboot, again booting with iBoot.

11. This time, select your new OS X HDD.

12. It will boot.

13. Put the DSDT.aml file on the desktop.

14. Download and install the Mac OS X 10.6.8 Combo Update, but DO NOT REBOOT.

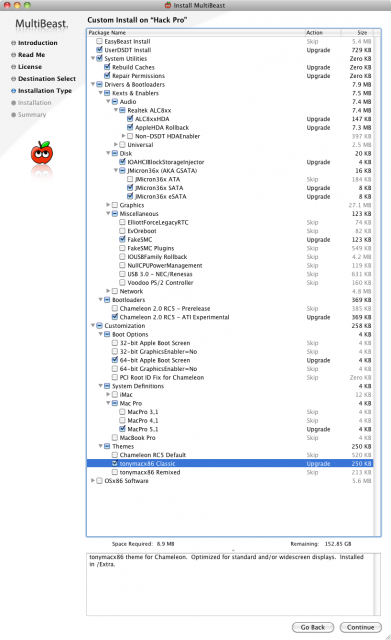
15. Use MultiBeast with these settings on your OS X HDD:

Click on the image to see it full-size.

16. Remove the iBoot disk and reboot, this time booting from the OS X HDD.

17. Success!

This entry was posted in Hacking/Modding, How-to and tagged , , . Bookmark the permalink.

10 Responses to i7-950 + Sabertooth X58 + AMD HD 5850 Hackintosh Guide

  1. Sanjay says:

    i jus followed yr steps , doesnt work.

  2. Johann says:

    Thanks for the guide. Everything is working well except the firewire. Have you had any issues with it. Thanks.

  3. Dima says:

    Installation worked using Sata1 on 6g/s (grey) port and DVD on sata1 of black ports using the following tags -

    PCIRootUID=1 UseNvidiaROM=yes -v

    Followed the directions step by step and now I am getting IOAPIC: Version 0×20 Vectors 88:111
    Crash

    Anyone?

    • Dima says:

      Fixed by changing ram… No idea why.

      • Jamie Rooney says:

        You said fixed by changing RAM – changing slot, size, amount, type (frequency)?
        Which PCIe slot is your gfx card located during your install?
        And your HDD was in the 6GB/s Sata Port1, correct?

  4. Michael says:

    What BIOS version are you using?

  5. Pat says:

    So I have almost the exact setup.
    Asus Sabertooth x58
    Intel i7 970
    I have 4 GB’s of ram in, will it really make a dif if I have 1x2gb in?

    I have the HDD plugged into 2Sata 6gb/s instead of 1 because the position in my case makes that pretty much impossible.
    DVD is in either regular SATA 1 or 2, I don’t recall which.

    I run the flags -x -v -f cpus=1 pcirootuid=1 busratio=21

    I do not get too far – never to the Install screen. When running in verbose (-v) to see the steps it is taking, it eventually gets to “Still waiting for root device.”
    What do? lol

  6. Laurence says:

    I have the exact setup in the article, but before I can install OSX whilst it’s loading it hangs on the apple logo with the thinking animation. I looked in -v and saw that the last line was DSMOS has arrived, and it just hangs.

    Any ideas?

    • Spinner says:

      Any progress with this. I’m trying to install on an existing Intel system and aslo hanging with a blanks screen after the DSMOS line.

  7. fane patent says:

    Very helpful post.
    I spent 5 days trying to get Snow Leopard 10.6.3 to work and then another 3 days to get Lion to work.
    But is was worth it.
    Thanks

Leave a Reply